Before you start the video, here’s a question for you: Are you new to electronics? Don’t worry! Just keep watching and write down any words you don’t understand. After the video, we’ll help you learn them!
Circuit Diagram
Components Required to Build the Project
Breadboard (Want to know what is breadboard and how it works? check this link out )
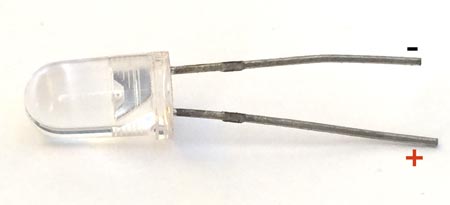
If you look closely at an LED, you’ll see that one leg is longer than the other.
✅ The longer leg is the positive side (called anode). ❌ The shorter leg is the negative side (called cathode).
This helps us know which way to connect the LED so it works properly! 💡😊
Tip 2:Choosing the Resistor Value for LED:
A resistor is very important! ⚡
If you connect a battery directly to an LED without a resistor, the LED will burn out instantly. 🔥💡
To keep the LED safe, we must use a resistor in series. This controls the amount of electricity flowing through the LED so it doesn’t get too much power. 😊
To find out which resistor to use with an LED, we need to know how much power the LED needs.
🔴 LEDs use about 20mA of current and need 2-3V to light up. This is called Forward Voltage (Vf).
Different LED colors may need more or less power depending on their type. That’s why we use a resistor to make sure the LED gets the right amount of power and doesn’t burn out!
How did it go? Were you able to understand everything?
If yes, Excellent !, re-watch the video, see if that make a difference, let me watch the video again
Did we miss any other words that you didn’t understand in this video?
After learning the meaning of the words you didn’t understand, let us know if anything is still unclear! We’ll add more explanations and make it even easier to understand. Feel free to leave a comment!